JavaScript: 프로토타입
자바스크립트의 객체지향, 프로토타입
이번 글은 [JS] 프로토타입(Prototype)을 바탕으로 작성한 글이다. 이전에도 프로토타입에 괸련된 글을 썼지만 감을 잡지 못하면 어렵고 헷갈리는 부분이다.
자바스크립트는 우리가 익숙한 자바와는 달리 프로토타입 기반의 객체지향을 지원한다. 클래스 기반의 객체지향과 차이점이라면 class가 없다.
자바스크립트는 class가 있는데? 라고 생각할 수 있지만 이번 글에서 프로토타입을 다루며 함께 작성해보려 한다.
프로토타입
원본 객체를 원형으로 복제하여 객체를 만드는 구조를 프로토타입 기반 객체지향이라고 한다.
사실 이렇게 보면 무슨말인지 절대 모른다. 이제 천천히 예제를 통해 알아보자.
왜 프로토타입을 사용할까?
ES6의 class문법의 등장 전까지만 해도 생성자 함수를 통해 동일한 객체를 만들어 냈다.
function Student(name, age) {this.name = name;this.age = age;}new Student('name', 10);
이렇게 사용했는데 만약 Student 생성자 함수에 type이라는 고정된 값이 적용된다면?
function Student(name, age) {this.type = {key: 'Student',name: '학생',};this.name = name;this.age = age;}const peter = new Student('peter', 17);const john = new Student('john', 18);console.log(peter.type === john.type); // false
peter와 john의 type프로퍼티의 주소는 다른 주소를 가진다.
const peter1 = new Student('peter1', 17);const peter2 = new Student('peter2', 18);...const peter100 = new Student('peter100', 19);
만약 객체가 100개 만들어진다면? 각각 새로운 메모리에 type이 100번 만들어지게된다. 이런 문제를 해결하기 위해 프로토타입을 사용한다.
function Student(name, age) {this.name = name;this.age = age;}Student.prototype.type = {key: 'Student',name: '학생',};const peter = new Student('peter', 17);const john = new Student('john', 18);console.log(peter.type === john.type); // true
Student.prototype.type을 만들어 값을 할당했고 peter.type처럼 Student.prototype.type에 접근했다.
그리고 peter.type과 john.type 객체는 같은 메모리를 사용하고 있다.
Student.prototype {type: ...}
Student.prototype이란 객체를 프로토타입으로 new Student(...)에서 접근할 수 있도록 했다. 이런 방식이 프로토타입 방식이다.
prototype 접근하기
위 예제에서 peter.type이 어떻게 Student.prototype.type으로 접근했을까?
이제 본격적으로 프로토타입을 알아볼 차례이다.
prototype
함수도 객체이다. 함수는 개발자가 접근할 수 없는 [[Call]]이라는 내부 메서드를 가진 호출 가능한 객체이다.
생성자 함수(함수가 모두 생성자 함수는 아님)는 [[Construct]]라는 내부 메서드를 추가로 가지는데 new와 함께 사용했을때 호출된다.
함수도 객체이므로 프로퍼티가 있고 생성자 함수는 prototype이라는 프로퍼티를 이미 가지고 있다.
__proto__
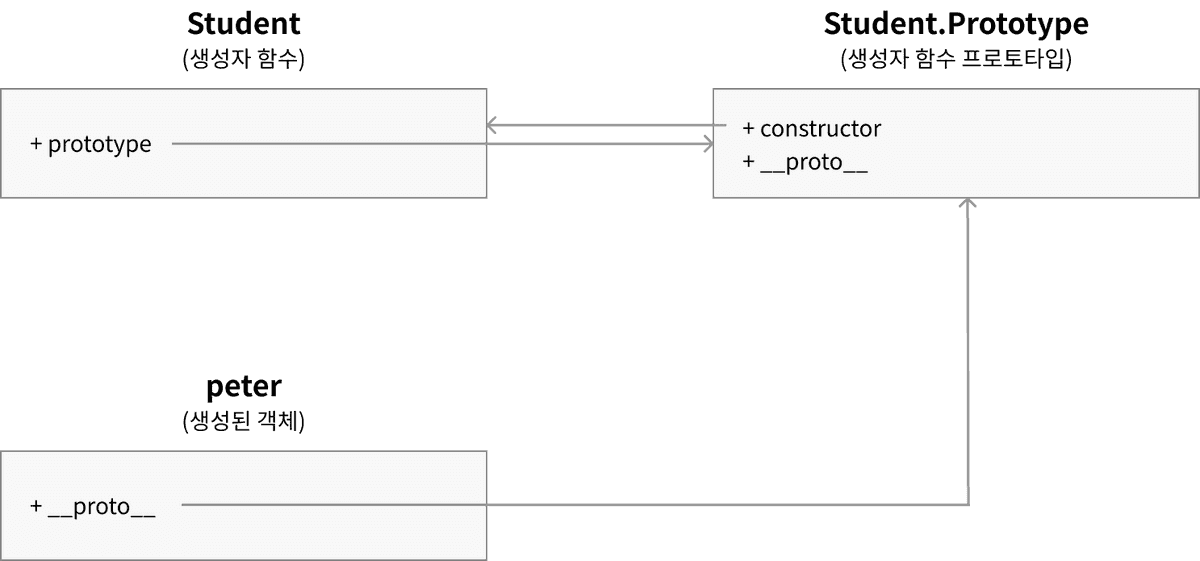
프로토타입 링크이다. 아까의 궁금증이 이제 풀리는 순간이다. __proto__는 모든 객체가 가지는 프로토타입 링크라는 프로퍼티이다.
__proto__라는 프로퍼티를 통해 생성자 함수의 prototype (Student.prototype)에 접근할 수 있다.
참고
Object.create(null)의 반환값은 프로토타입이 없는 객체로__proto__링크가 없음
function Student(name, age) {this.name = name;this.age = age;}Student.prototype.type = {key: 'Student',name: '학생',};const peter = new Student('peter', 17);console.log(peter.__proto__.type); // { key: 'Student', name: '학생' }console.log(peter.__proto__ === Student.prototype); // true
peter.__proto__와 Student.prototype은 연결되어 같은 값이다.
또한 __proto__는 생략가능하기에 peter.(__proto__).type으로 접근할 수 있는 것 이다.
constructor
Student.prototype.constructor이라는 값은 기본적으로 생성자함수에게 부여되는 프로퍼티이다.
생성자 함수 자신을 가르키는 값인데 생성된 객체에서 자신의 생성자 함수를 알 수 있다.
// 위 예제console.log(Student.prototype.constructor === Student); // trueconsole.log(Student.prototype.constructor === peter.constructor); // true
프로토타입에 관련해 정리된 그림이지만 사실 난 봐도 잘 모르겠다. 예제가 더 편하긴 했다.
Student.prototype에 __proto__라는 링크가 있는건 Student.prototype 또한 객체이기에 __proto__ 내부 링크가 존재한다.
class 문법
ES6에서 class를 지원하기 시작했다.
class Student {constructor(name, age) {this.name = name;this.age = age;}}
자바와 유사한 문법으로 지원하지만 내부적으로 프로토타입 기반으로 구현되어있다.
class Rectangle {static shape = '사각형';constructor(width, height) {this.width = width;this.height = height;}getArea() {return this.width * this.height;}}
static과 내부 메서드를 작성한 Rectangle을 프로토타입으로 작성한다면 아래와 같을 것이다.
function Rectangle(width, height) {this.width = width;this.height = height;}Rectangle.prototype.getArea = function () {return this.width * this.height;};Rectangle.shape = '사각형';
이렇게 구현할 수 있다. 물론 extends를 통해 상속이 추가되면 더 복잡해질 것이다.
하지만 중요한건 class도 프로토타입으로 이루어져있다는 것이다.
